What is Hybrid Backup Sync 3?
Hybrid Backup Sync 3 is an application designed for creating user data backups. It allows for data synchronization and recovery, enabling users to easily secure their data by storing copies in local or remote repositories as well as in the cloud. You can download it directly to your server from the App Center. If that’s not possible, the official QNAP website (qnap.com) offers assistance.
Backup vs. Synchronization: What’s the difference?
In the application, you can create both backups and synchronize files. The difference between these two functions is significant. When creating a backup, if you delete data from the directory that was backed up, the data remains in the backup and can be recovered. However, with synchronization, if you delete data on one device, it will also be deleted on the other device, making recovery impossible. Various synchronization methods are available, which will be discussed later.
What types of backups does the application offer?
To the Cloud – All backups are sent to a repository located in the cloud. The most popular options include Azure, Backblaze, Dropbox, Google Drive, and OneDrive. While the application is free, remember that using more space often involves costs. Free subscription plans typically offer only a few GB of space. The supported cloud services can be seen in the screenshot below.

To local NAS – Backups are sent to a local NAS, simply copying files from one directory to another. This protects against accidental deletion of data from the main directory but does not protect against hardware failure. If the disk fails, data will be lost.
To remote NAS – Files are sent to a remote QNAP server, providing proper protection against hardware failure. Imagine your disk or device fails; with previous local server copying, your data would be lost. However, sending copies to another server reduces the chance of simultaneous failures.
Types of synchronization
One-way Synchronization Task – As the name suggests, data is synchronized only in one direction. Data can be sent from the local NAS server to the cloud, a remote QNAP server, or a remote server from another manufacturer.

Two-way Synchronization Task – Files are synchronized on both devices and can be done only to the cloud and a remote QNAP server. This option cannot be configured for an external server from another manufacturer.

Active Synchronization Task – A task involving synchronizing data from the cloud, remote QNAP server, and another manufacturer’s server to your QNAP NAS.

What protocols does HBS3 use?
RTRR (Real Time Remote Replication) – This protocol allows communication only between QNAP devices and can be enabled directly in the Hybrid Backup Sync 3 application.
RSYNC (Remote Synchronization) – This protocol synchronizes files over the network, allowing data synchronization between servers from different manufacturers, provided the system supports the protocol.
Time Machine – This function allows you to create a backup of a Mac OS computer.
Application installed, What’s next?
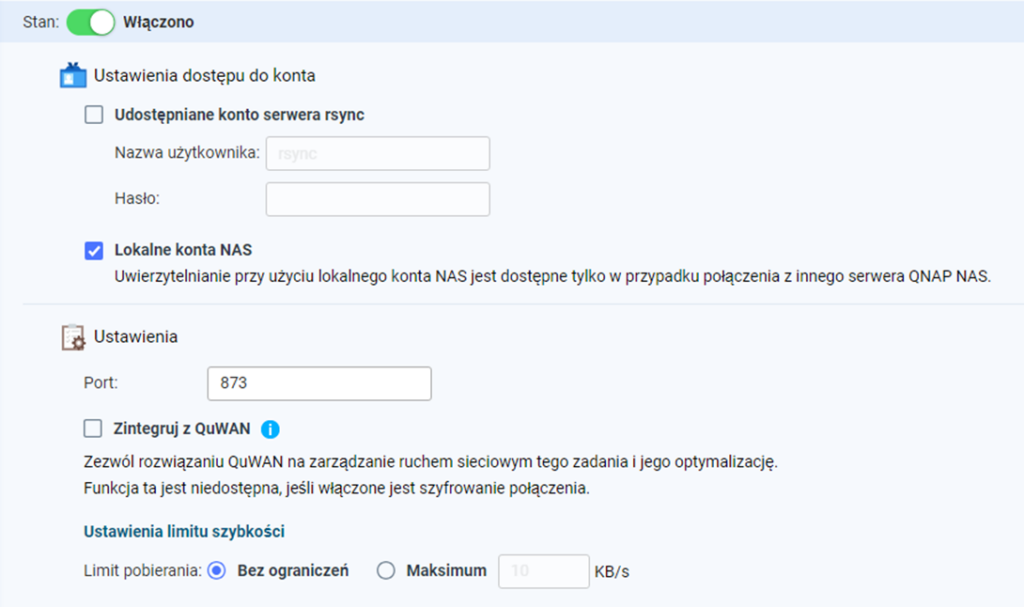
The first step is to enable the appropriate protocol to correctly send data between devices. Navigate to the Services tab, then activate RTRR, RSYNC, or Time Machine. Click the switch to enable the protocol on the device and configure an access password (preferably a complex one to enhance security). Another option for RTRR communication is using an account belonging to the Administrator group. If connected through a regular user account, communication will not be established.

The next step involves setting the appropriate communication port and several additional settings.
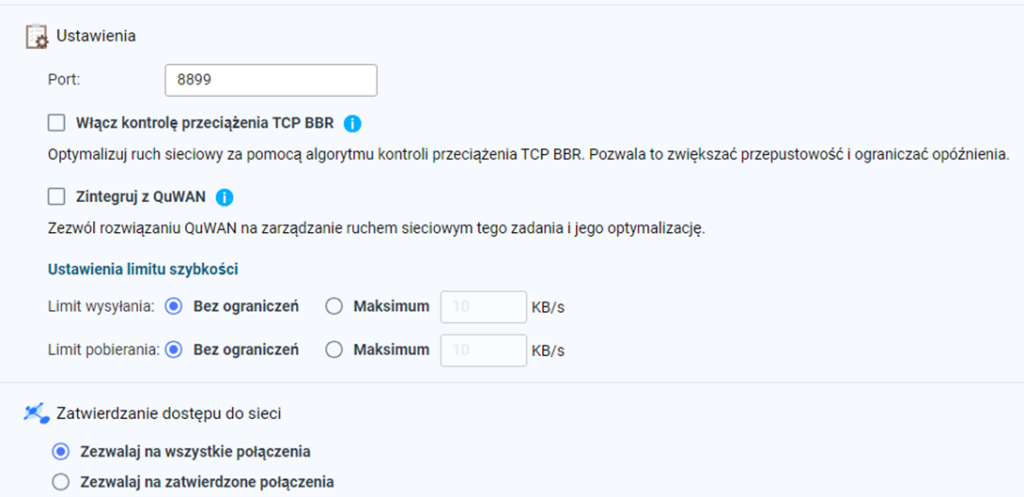
The default port is 8899. Remember, if you change it, you must also change it in the task to maintain the connection. TCP BBR congestion control optimizes transmission speed, increasing bandwidth and reducing latency but is only available on 64-bit architecture devices. Integrating with QuWAN allows managing and optimizing network traffic for tasks using the service.
Setting a speed limit can prevent overloading the network, especially during enterprise work hours. Another crucial setting is network access, which should be enabled. By default, HBS3 allows all connections, meaning anyone with the password can connect to your device using the RTRR protocol. After saving the settings, you can create backups using RTRR.
For RSYNC configuration, the setup is similar to the first protocol, but you additionally set a username for login. You can log in with a regular account on the QNAP server. RSYNC lacks congestion control, connection restrictions from specific IP addresses, and upload limits.
After configuring the appropriate protocol, it’s time to add repositories. Go to the Repositories tab and check the local storage, which should be created during HBS3 installation.

View storage data, including QNAP NAS model, IP address, total space, and usage. You cannot set a threshold alert from this level; it must be done from the control panel. To add new storage, click Create and choose the appropriate type.
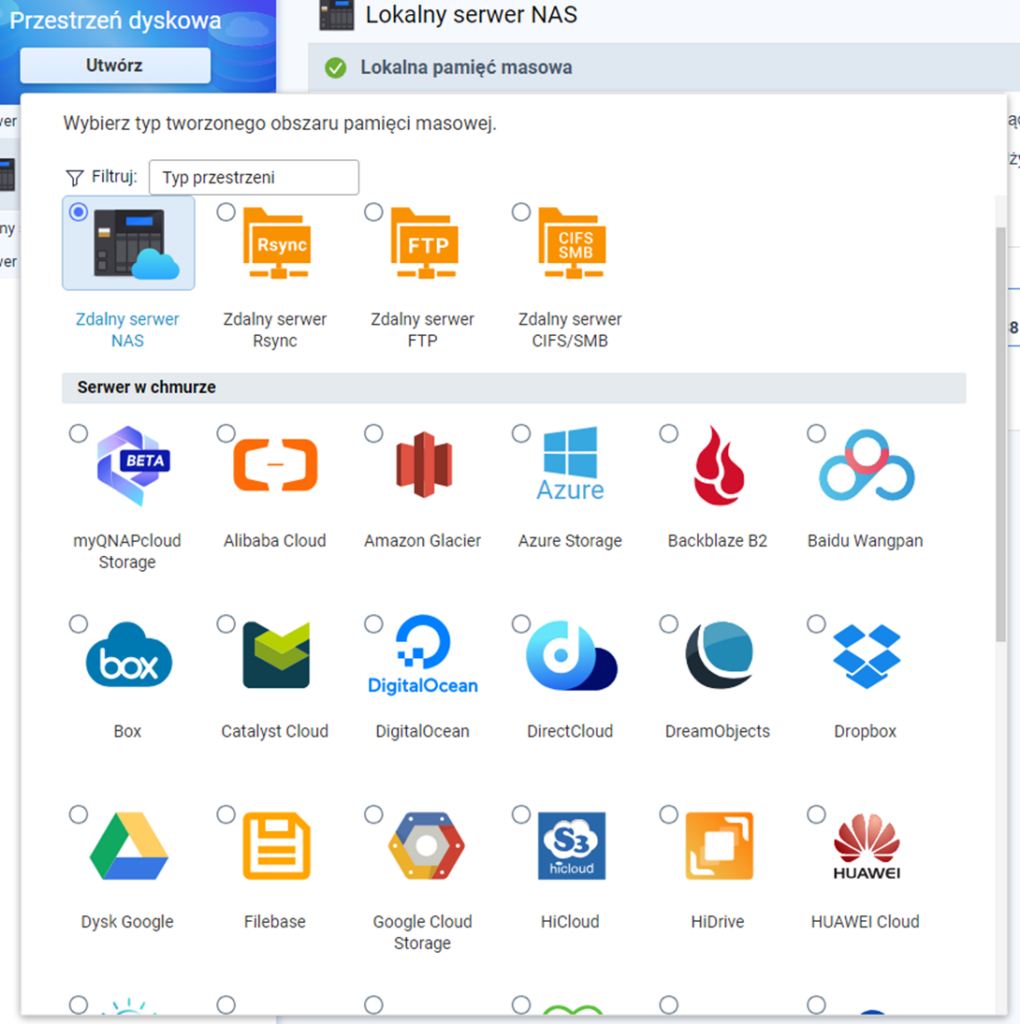
Focus on adding a second repository on a remote QNAP server. Ensure HBS3 is installed and correctly configured on both devices for communication. Enter the IP address and appropriate credentials for communication. You can also use the option to search for available servers on the network.

After entering the correct credentials, click Detect Server and Test Connection to ensure a proper connection between the devices.
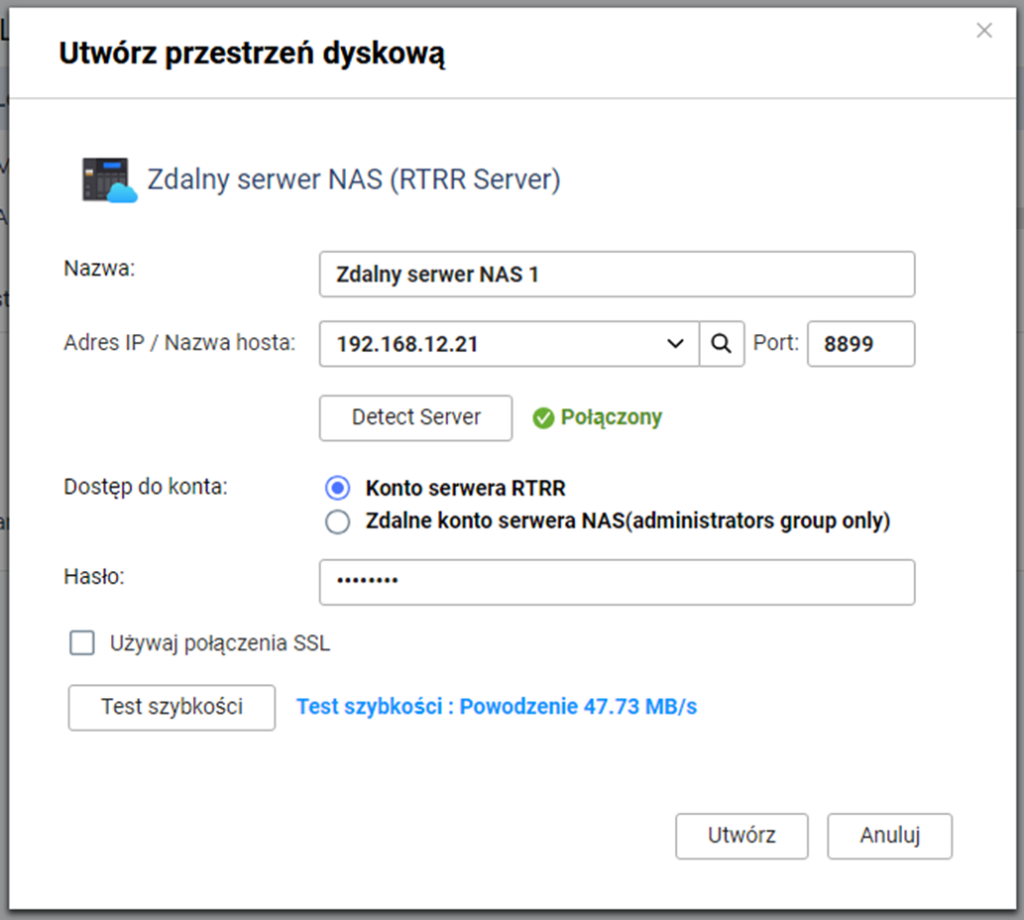
Once the storage is added, view the details.

What if the other device doesn’t have RTRR enabled?
If RTRR is not enabled on the other device, HBS3 will detect this and allow you to enable the protocol from the application. A message about the disabled RTRR service will appear.

Click Enable, proceed to configuration, and log in as an administrator to configure HBS3.

Set a password for RTRR, but you cannot set other options such as bandwidth limitation or allowed connections from specific IP addresses from this level. These can only be configured on the second QNAP NAS device.

The protocol has been enabled remotely.
Adding myQNAPcloud storage
Adding QNAP’s cloud storage is straightforward and takes about 3 minutes. After selecting myQNAPcloud, a window appears where you need to log into your QNAP account.

Grant HBS3 application access.

Next, enter the name and choose the cloud region.
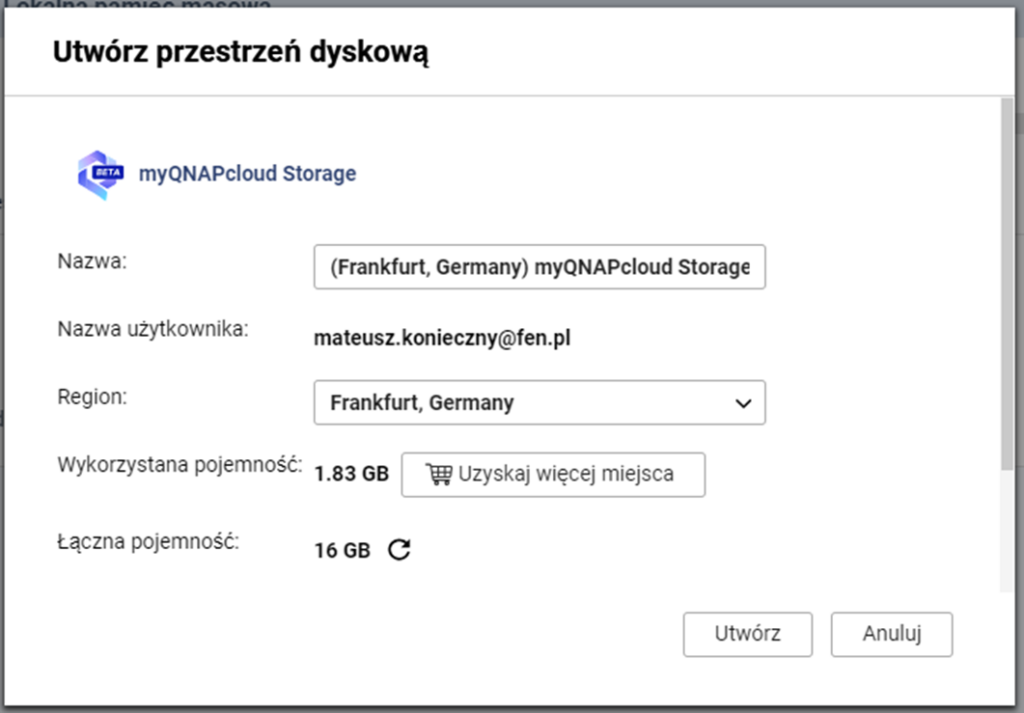
The cloud has been successfully added to HBS3, allowing you to create backups.
Creating a Backup
To create a backup of your data, go to the „Backup and Restore” tab, then click „Create Backup Now.” Two options will appear: „New Backup Task” and „Rebind to a Backup Task.” The first option creates a new task, while the second rebinds a task that was deleted but whose data is still in the repository.
First, select all the directories you want to back up.
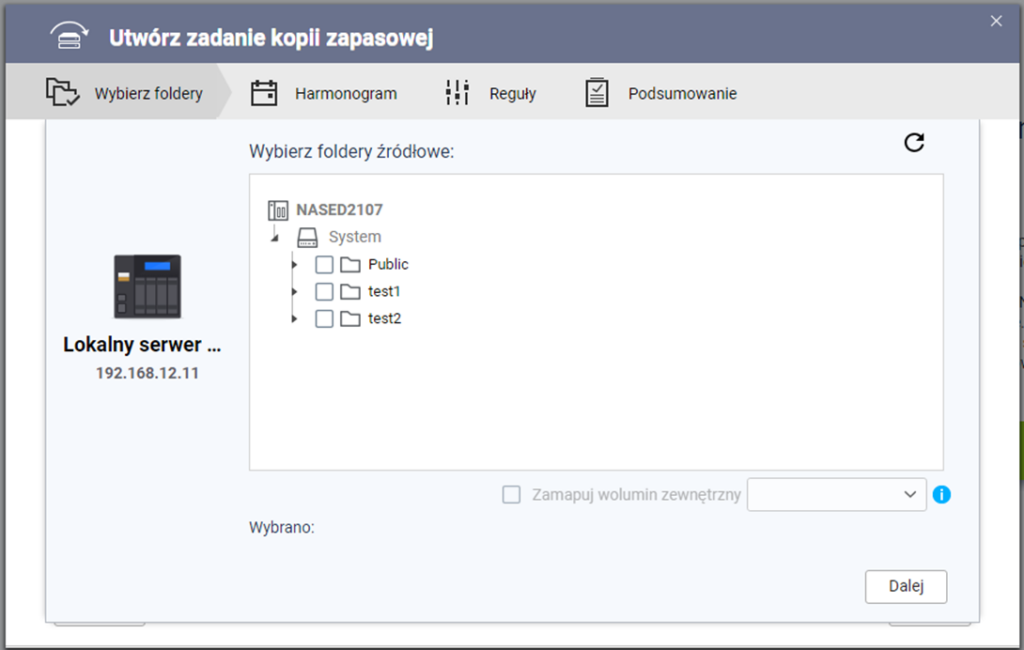
The second step is to choose the destination location, which is your repository.
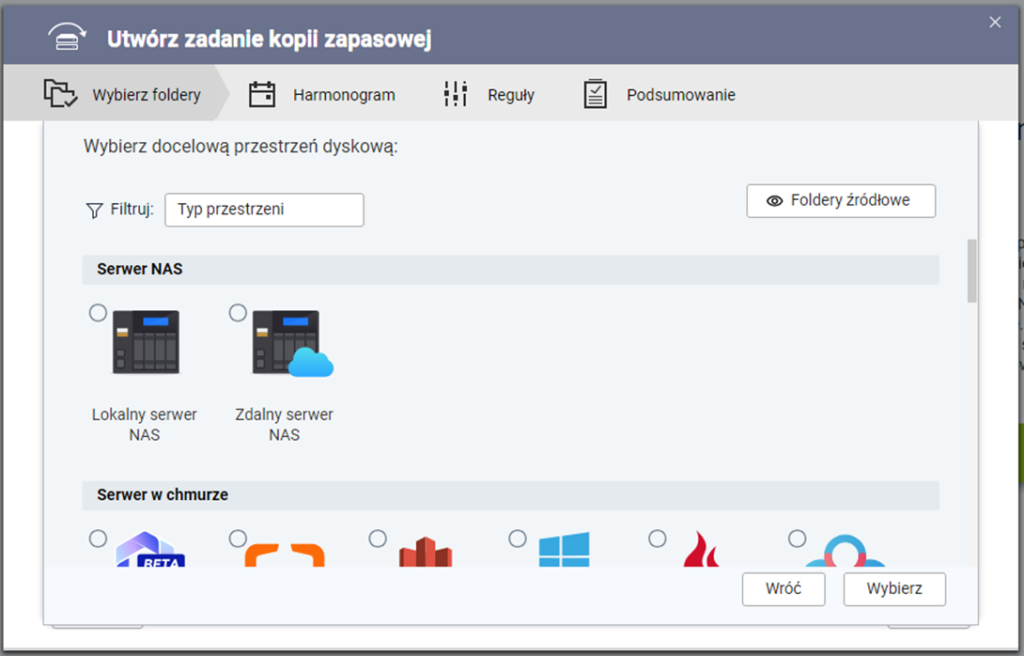
In our case, we select Remote NAS Server, and a list appears where we choose our remote server added to the Space.

The next step is to select the target folders where the backup will be stored.

Then set the task schedule, with four options to choose from:
Schedule – The task runs according to the set schedule, available as a one-time, periodic, daily, weekly, or monthly copy. Up to 30 plans can be set.
Run After Task – The backup is executed after completing another task. This way, you don’t need to calculate how long the previous backup will take and can configure one backup after another.
No Schedule – The backup runs when the backup button is clicked in the application.
Automatic Backup – The task starts each time an external storage device is connected to the NAS server.
In the second tab, you can enable version management. Important note – options cannot be edited after configuring and saving the task. Options include versioning through X available versions, X days, and intelligent storage, where you can set the number of hours/days/weeks/months/years for each version within the specified time frame.
The last tab is for checking data integrity.
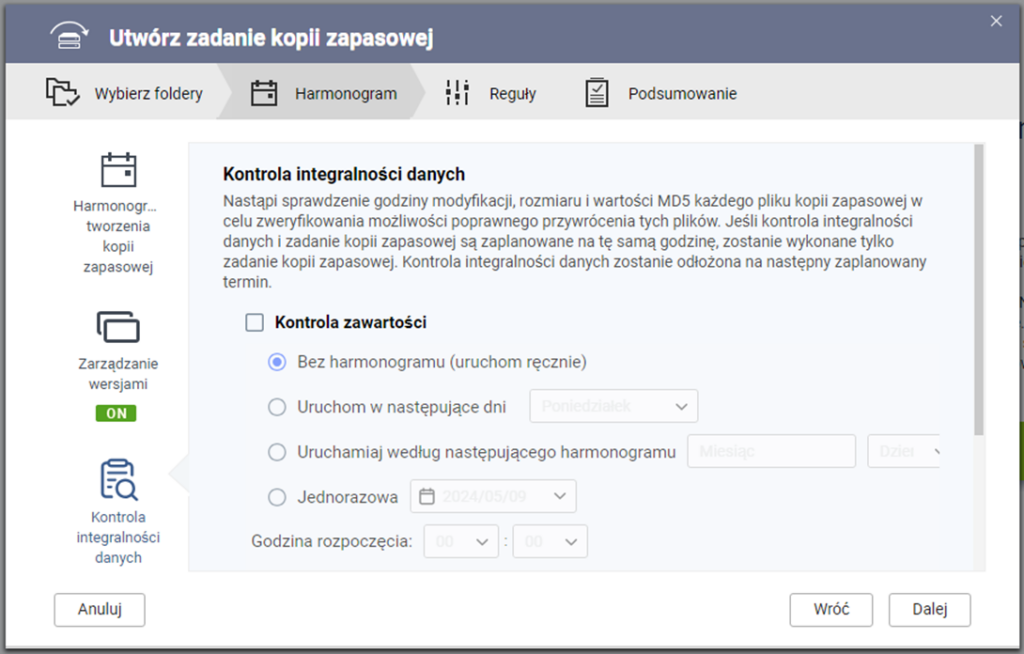
After combining functions, size, modification time, and MD5 value for each file are verified to ensure file restoration capability. This check cannot be performed simultaneously with the backup as it will not execute. The process requires considerable resources, so patience is needed, depending on the amount of data and the equipment you have.
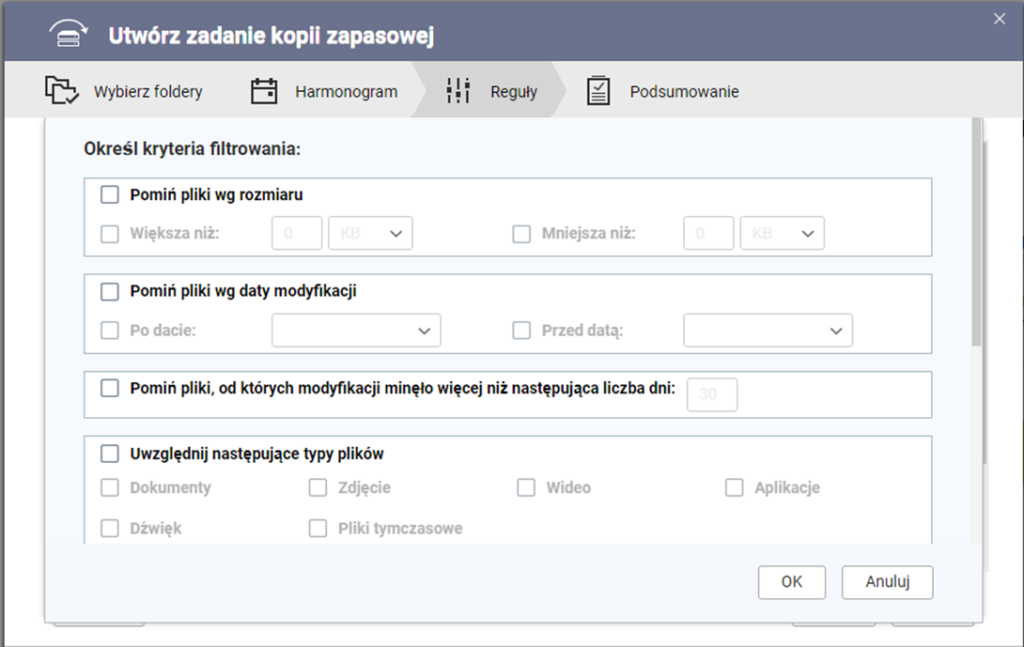
In the next step, set filters such as ignoring symbolic links, skipping hidden files and folders, and skipping temporary files generated by the system. You can also set filtering criteria to specify which files to back up.
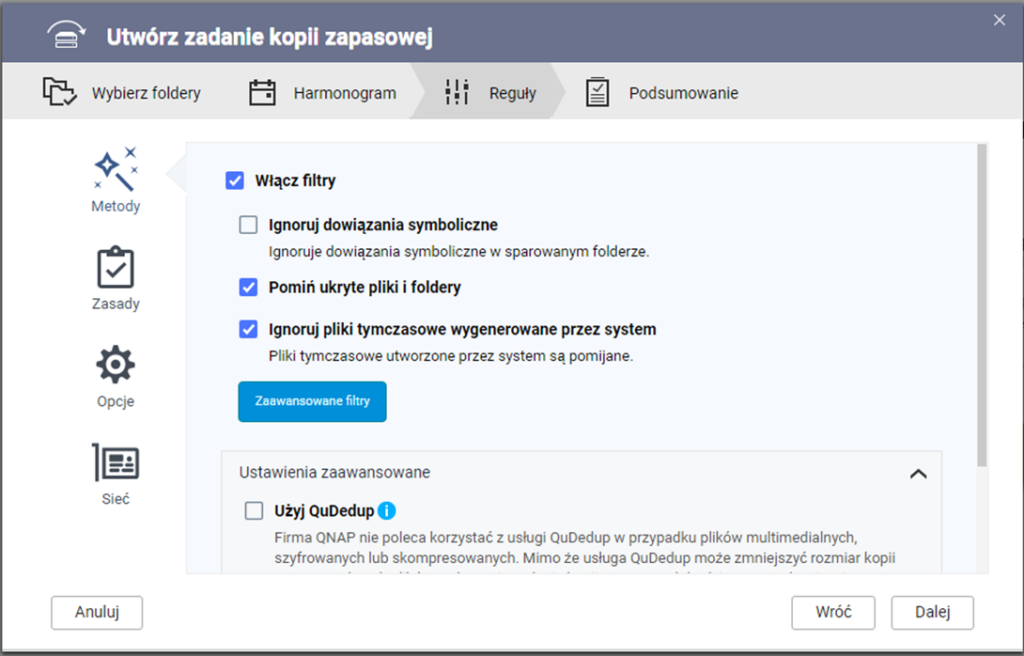
In advanced settings, you can enable QuDedup, which deduplicates data blocks, available only on x86 64-bit Intel, AMD architecture.
In the policies, you can set client-side encryption, speed limits (set only for a specific task, while for RTRR protocol, it was set for all tasks), TCP BBR congestion control (also for a specific task), and QuWAN integration for the specific task. Advanced options include deleting additional files from the target folder, i.e., removing target data that does not exist in the source folder. Other options include detecting empty files, checking file contents, and compression during transmission.
In the Options tab, you can set the maximum log size, with the default value being 10MB, and the largest possible log can be set to 1024MB. Additional options include setting notifications for the task.
The last tab is network settings, and the default option is Automatic Selection, where the application chooses the most optimal interface for operation. There are also two other options:
Default Route – For traffic without a specified route, the system selects the interface based on the system packet forwarding rule.
Manual – Allows selecting a specific interface for the HBS3 application.
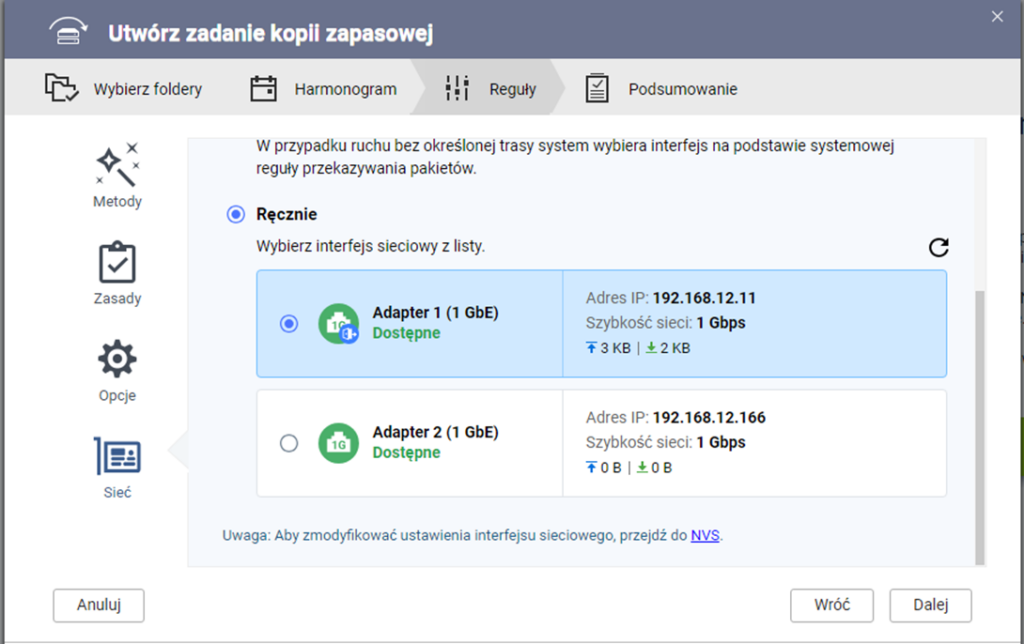
After reaching the end of the backup task configuration, a brief summary appears, and after saving, everything is set up.
Backup properly configured, Now it’s time to restore files
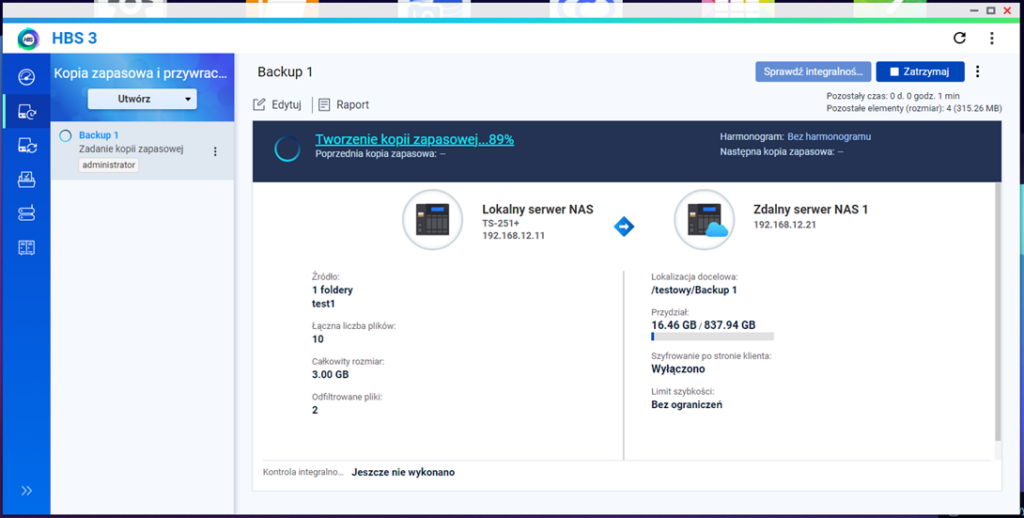
Create new restore tasks.

Select the source storage space, which in our case is the remote NAS server.
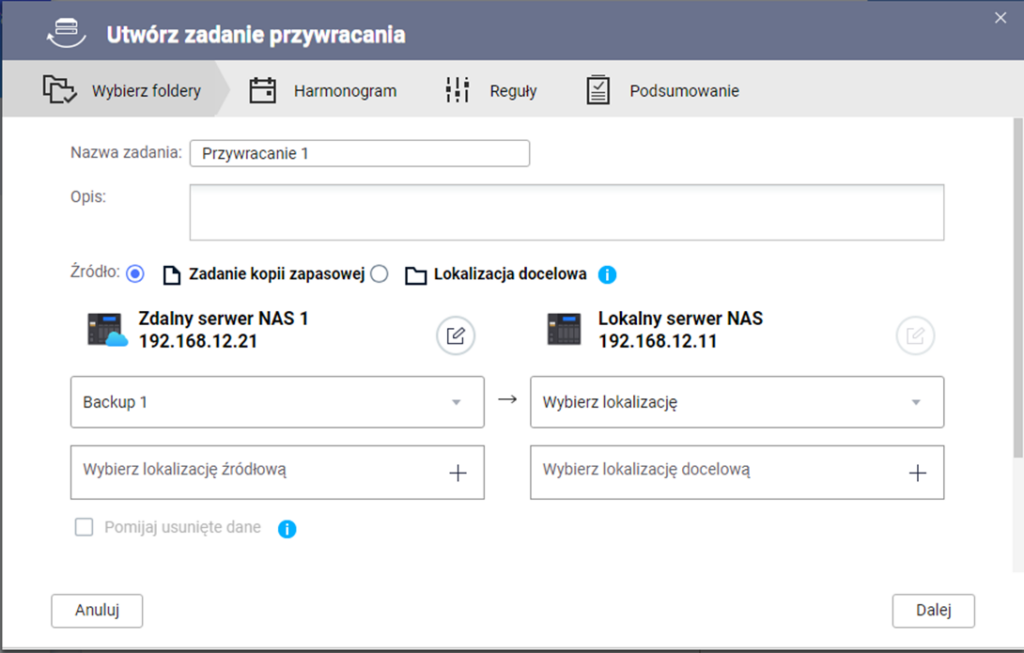
As the source, you have two options:
Backup Task – Select from the list a specific backup task.
Target Location – Indicate the directory where the backup is located.

In the second list, select where you want to restore the backup.
Original Location – Send data to the directory from which it was retrieved.
Select Location – Indicate any other directory to send the backup.
Finally, set conflict resolution rules.

In the next step, set the schedule. The options have been discussed earlier, so they are skipped.
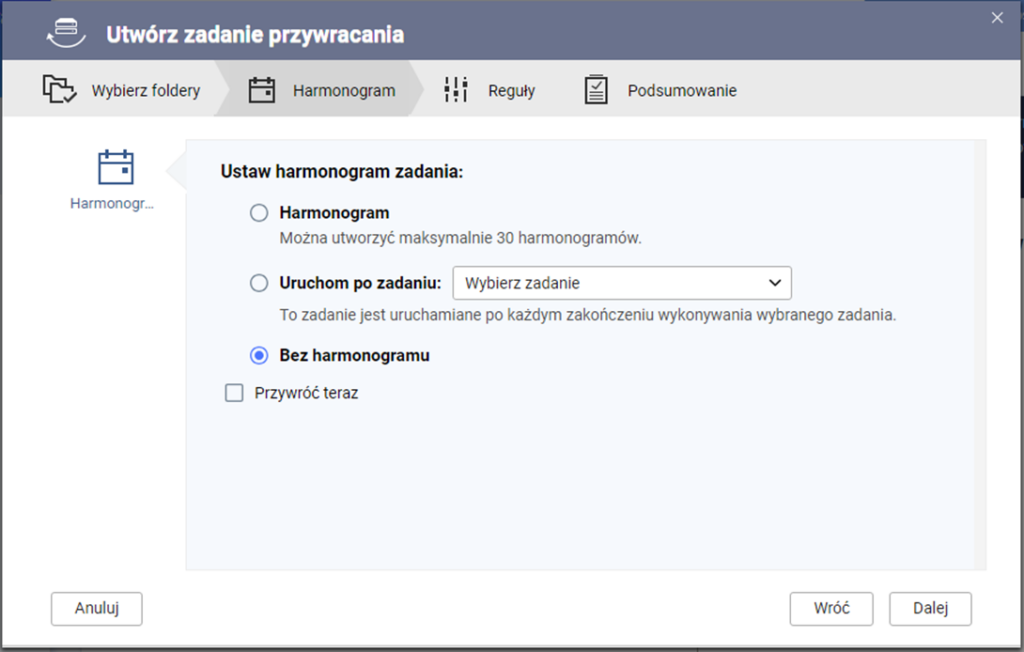
The next step is to set rules and options similar to those in creating a backup task, with additional options to replicate ACL list and attributes and handle error rules.
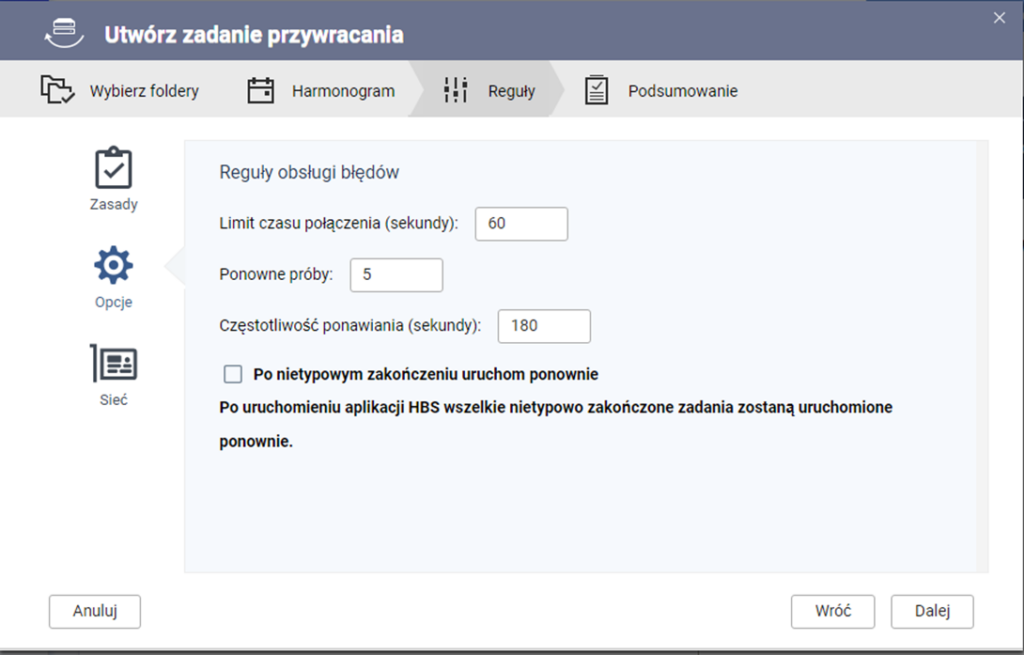
A summary concludes the task configuration. Now, just wait for the data to be restored.
Data synchronization
In every type of synchronization, the options are practically the same, so it will be discussed using the two-way synchronization example. To create a task, go to the Synchronization tab, then click Synchronize Now and choose the type.
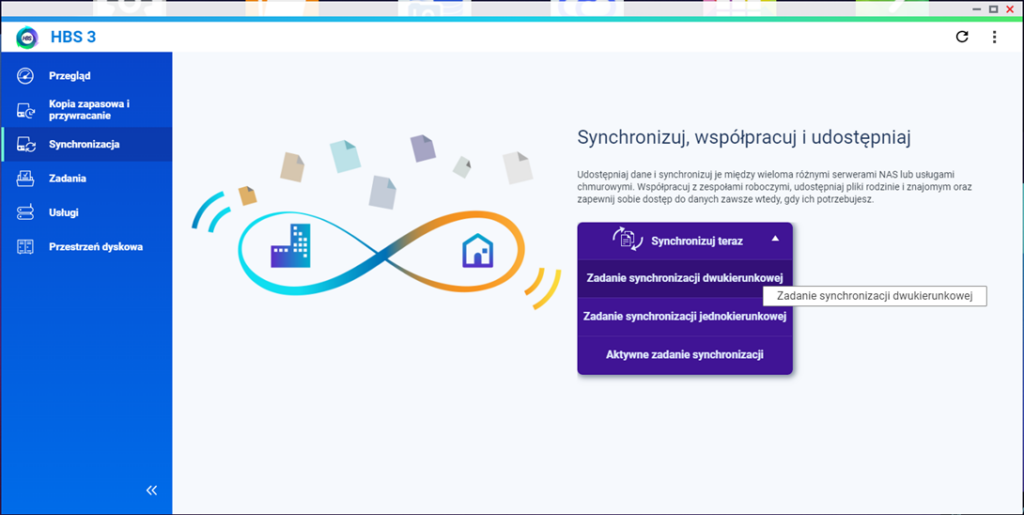
First, select the target space to synchronize, which in our case is the remote NAS server. Use the same server where the backup task was created earlier.
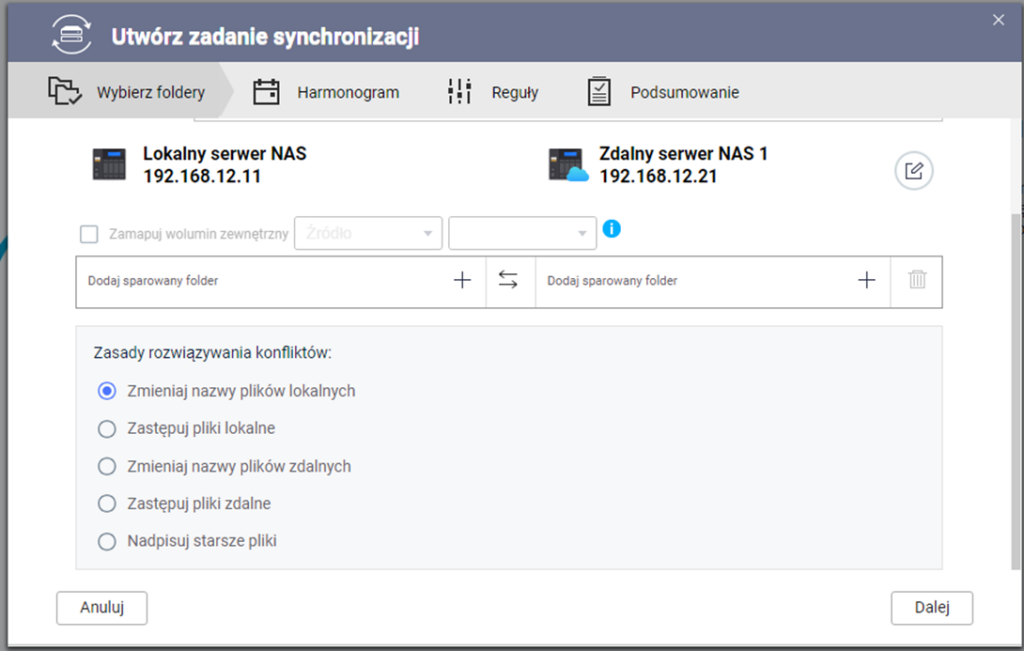
In the next step, select paired directories to synchronize and set conflict resolution rules, specifying the action when identical files are uploaded to the same directory.
The next step is to set the schedule. Synchronization can be set even every 5 minutes, but consider the time for correct previous synchronization to avoid overlapping tasks. Additionally, set inactive periods for synchronization.
The next step involves setting rules, which are 95% the same as in the backup task, so it is skipped. The summary is the last step, and the synchronization task between two devices is created.
Final steps
Overview – This tab shows task statuses, disk space, and alert logs. View all tasks running on the local server and those created on the remote server. Monitor the number of tasks currently running, stopped, encountered errors, with warnings, and those not started.

Repositories – View repository status for your storages. If a repository is disconnected for any reason, an alert will appear.

Alert Log – Ideally, no errors should appear here. 🙂
This concludes the configuration and synchronization of data using QNAP’s Hybrid Backup Sync 3.
If you have any questions – write to me!


